The impact screen serves two critical functions that seem almost contradictory:
- Stopping a golf ball traveling 150+ mph without breaking
- Displaying a crisp, clear projected image
It needs to be tough enough to absorb thousands of impacts and smooth enough to look like a TV screen. Get this balance wrong, and you'll either be replacing screens constantly or squinting at a grainy image.
Let's break down what makes a great impact screen and how to choose the right one for your setup.
What Makes a Good Impact Screen
Durability: Surviving the Abuse
A golf ball leaving a driver face at 170 mph carries significant force. Your screen needs to handle that force—thousands of times—without tearing, stretching out, or developing weak spots.
What determines durability:
Weave tightness: A tighter weave distributes impact force across more material. Loose weaves concentrate force at individual fibers, leading to faster wear.
Material quality: Premium screens use heavy-duty polyester in multiple layers. Budget screens use thinner, single-layer materials.
Layer count: Multi-layer construction (2-3 layers) dramatically improves durability. The layers work together to absorb and distribute impact.
Reinforced edges: The edges take a beating from mounting tension. Quality screens have reinforced vinyl edges and quality grommets that don't pull out.
Real-world expectations:
- Budget screens: 1-2 years with moderate use before showing significant wear
- Mid-range screens: 2-4 years
- Premium screens: 5+ years, often lasting the life of the simulator
Premium screens like Carl's Place Premium are tested to withstand 250 mph impacts for thousands of shots. That's beyond what any amateur produces, providing serious margin.
Image Quality: Your Virtual Golf Course
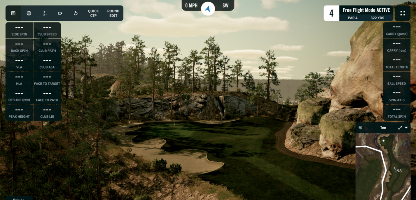
The screen isn't just stopping balls—it's your window into the virtual world. A bad screen means a bad visual experience, no matter how nice your projector is.
What affects image quality:
Surface smoothness: A smooth, tight surface produces a crisp image. Textured or loose surfaces scatter light and create graininess.
Hotspotting: Cheaper screens reflect projector light unevenly, creating a bright spot in the center and dimmer edges. Quality screens minimize this.
Color accuracy: The screen material affects how colors appear. Pure white screens can look washed out; some gray screens improve contrast.
Wrinkles and sag: A poorly tensioned screen develops wrinkles that distort the image. Proper mounting matters.
When evaluating screens, look for terms like "HD quality," "4K compatible," or "projection-grade surface." These indicate the manufacturer has prioritized image quality alongside durability.
Bounceback: Safety First
When a ball hits the screen, where does it go?
Too tight screen:
- Ball bounces back hard
- Can return toward the golfer at dangerous speeds
- Also increases noise dramatically
Too loose screen:
- Ball drops straight down
- Image quality suffers (wrinkles, sag)
- Screen may billow and touch the wall
The sweet spot:
- Ball absorbs into the screen
- Drops relatively straight down with minimal bounce
- Some forward bounce (toward the front of the enclosure) is acceptable
Bounceback is controlled by two factors: the screen material itself and the tension at which it's mounted. Quality screens are designed for controlled deformation—they give on impact, absorbing energy, then return to shape.
The physics: When a ball hits a tight screen, the screen can't deform. Energy reflects back into the ball. When a screen can deform properly, energy is absorbed into the material's movement rather than returning to the ball.
Screen Tiers Explained
Standard Screens
Characteristics:
- Single or light double-layer construction
- Looser weave
- Basic materials
- Adequate durability for light use
- Acceptable but not outstanding image quality
Best for: Budget builds, occasional use, introductory setups
Limitations: Will show wear faster, less crisp image, may require replacement sooner
Price range: $150-$300 for common sizes
Example: Carl's Place Standard
Preferred Screens
Characteristics:
- Tighter knit construction
- Silicone reinforcement (some models)
- Better image quality
- Improved durability over standard
Best for: Regular home use, golfers who want better visuals without premium cost
Price range: $250-$450
Example: Carl's Place Preferred
Premium Screens
Characteristics:
- Triple-layer construction
- Heavy-duty, tight-knit polyester
- Smoothest surface for best image
- Noise-dampening center layer
- Professional-grade durability
- Tested to 250 mph+ impacts
Best for: Serious home simulators, commercial installations, anyone who wants the best
Price range: $400-$800+
Example: Carl's Place Premium, SIGPRO Premier
High Contrast Gray Screens
Characteristics:
- All the benefits of premium screens
- Gray surface material
- Improves contrast and color in bright rooms
- Reduces washout from ambient light
Best for: Rooms with ambient light issues, bright garages, spaces where blackout is impractical
Price range: $500-$900+
Example: Carl's Place High Contrast Gray, SIGPRO Premier Gray
When to consider gray: If your simulator space has windows you can't fully cover, overhead lighting you can't fully dim, or any ambient light bleeding in, a gray screen significantly improves the visual experience. The gray surface absorbs ambient light rather than reflecting it, improving perceived contrast.
The Tension Balancing Act
How you mount your screen matters as much as the screen itself.
Too Tight
- Excessive bounceback (dangerous)
- Loud impact sound
- Puts stress on grommets and edges
- Can cause premature wear
Too Loose
- Wrinkles and ripples in the image
- Screen may sag in the middle
- Ball may cause screen to billow backward
- Unprofessional appearance
Finding the Sweet Spot
Most screens are mounted using ball bungees through grommets. The number and placement of bungees, and how tightly they're stretched, controls tension.
General approach:
- Start with moderate tension—enough to remove major wrinkles but not drum-tight
- Hit some balls and observe bounceback
- Adjust tension (tighter = more bounce, looser = less bounce)
- Find the balance where the ball drops reasonably straight down without excessive return
Factors that affect your ideal tension:
- Your typical ball speed (faster requires slightly looser)
- Your typical spin rates (higher spin balls grab the screen more)
- How far you stand from the screen
- Whether your screen has wall/backing behind it
Most golfers find their tension sweet spot through experimentation. Don't be afraid to adjust after initial setup.
Mounting Hardware
Ball bungees: The standard choice. Small balls that grip the screen's grommets, with elastic cord that wraps around the frame. Available in 6" and 9" lengths (9" provides more tension range).
Zip ties: Cheaper but not adjustable. Good for initial setup, can be replaced with bungees later for fine-tuning.
Releasable zip ties: Better option if using zip ties—can be adjusted without cutting.
Cable systems: Some premium installations use cables through the bottom of the screen, creating controlled tension from the ground.
Size and Aspect Ratio
Common Aspect Ratios
4:3 (Standard): The most common for golf simulators. This ratio provides the vertical height needed to see ball flight while fitting typical room widths.
16:9 (Widescreen): Common for TV/movies but usually too wide and short for golf. You'd need extreme width to get adequate height.
1:1 (Square): Sometimes used in very tight spaces. Not ideal but workable.
Why 4:3 dominates: Golf requires vertical real estate. You need to see the ball climbing, the top of ball flight, and the descent. A 4:3 screen gives you this without requiring excessive room width.
Choosing Your Size
Your screen size is determined by:
- Your room dimensions (maximum possible)
- Your projector's throw ratio (what size image it can produce from your distance)
- Your launch monitor's requirements (some want specific screen sizes)
Common home sizes:
- Small/tight spaces: 8'x10' (4:3)
- Average home setup: 10'x12' or 10'x13' (approximately 4:3)
- Larger spaces: 12'x16' (4:3)
- Commercial/premium: 14'+ wide
How to determine your max size:
- Measure your available width and height
- Subtract space for enclosure frame (2-3 inches per side)
- Subtract buffer space from ceiling and floor (if relevant)
- The remaining rectangle is your maximum screen size
Then verify your projector can fill that size from your available distance (more on this in Article 6).
What Goes Behind the Screen
Your screen needs space behind it to deform when struck. A ball hitting a screen that's directly against a wall creates dangerous bounce—the screen can't absorb energy because it immediately hits the wall.
Minimum clearance: 6-12 inches behind the screen
Recommended: 12-18 inches
What to put back there:
Nothing: Works fine if you have the space. Ball hits screen, screen deforms into open air, ball drops.
Padded backing: Some golfers add foam panels, moving blankets, or heavy curtains behind the screen. This provides additional energy absorption and reduces bounce further.
Memory foam: The ultimate option. Mount memory foam panels to the wall behind the screen. Ball impacts, screen deforms into foam, foam absorbs energy, ball drops gently. This virtually eliminates bounceback.
Warning: Never mount the screen directly against a hard wall. This is both a safety hazard and will dramatically reduce screen life.
Retractable Screens: For Multi-Use Spaces
What if your simulator space needs to serve other purposes?
Options:
HomeCourse ProScreen 180: A motorized retractable screen that rolls up to the ceiling when not in use. Wireless remote control, professional quality, premium price (~$2,500-$3,500).
G-TRAK systems: Similar motorized retractable concept.
DIY pulley systems: Some handy golfers rig their own retractable setups with pulleys and manual operation.
Retractable pros:
- Multi-use space (garage can still park cars, room can serve other purposes)
- Clean look when not in use
- No permanent installation required
Retractable cons:
- Significant cost premium
- Moving parts that can fail
- Setup/teardown time each use
- May not achieve the same tension as permanent screens
If you're using your garage and need to park cars, retractable makes sense. If you have dedicated simulator space, permanent mounting is simpler and often better quality.
Screen Care and Maintenance
Keeping It Clean
Screens get dirty—dust, golf ball marks, occasional splash from drinks.
Cleaning approach:
- Dust regularly with a soft, dry cloth
- For marks, use a damp cloth with mild soap
- Never use harsh chemicals or abrasives
- Don't scrub—wipe gently
Handling Wrinkles
Screens often arrive folded and show wrinkles or fold marks initially.
To remove wrinkles:
- Mount with light tension
- Let it hang for 24-48 hours
- Gravity and tension usually smooth out wrinkles
If wrinkles persist:
- Increase tension slightly
- Use a clothing steamer (from a few inches away—never touch the screen)
- Never iron directly on the screen (can damage the material)
Knowing When to Replace
Signs your screen needs replacement:
- Visible wear pattern where balls hit most often
- Thinning material
- Reduced image quality (fuzzier than it used to be)
- Bounceback has increased despite tension adjustments
- Holes or tears (obviously)
Premium screens should last 5+ years with normal home use. Budget screens may need replacement every 1-2 years.
Common Screen Mistakes
Mistake 1: Skimping to Save $200
A $150 screen vs. a $400 screen seems like easy savings. But:
- The $150 screen may last 1/3 as long
- Image quality is noticeably worse (you'll see this daily)
- Bounceback is harder to control
- You'll eventually want to upgrade anyway
The screen is your visual experience. It's what you're looking at every single swing. This isn't where to cut corners.
Mistake 2: Wrong Aspect Ratio
Buying a 16:9 widescreen because "that's what my projector outputs" leads to a screen that's too short for golf. Yes, your projector may need to output a 4:3 image onto a 4:3 screen, with possible letterboxing in the software or display settings. That's fine.
Measure for height first, then width.
Mistake 3: Forgetting About Space Behind
"I'll just mount it right against the wall to save space."
Don't. You need that 12+ inches behind the screen. Without it, bounceback is dangerous and screen life is shortened.
Mistake 4: Over-Tensioning
More tension doesn't mean better image. It means louder noise, more bounceback, and faster wear on grommets/edges.
Start moderate. Adjust based on actual ball behavior.
Mistake 5: No Frame/Enclosure
Some golfers try to hang a screen from the ceiling and call it good.
Problems:
- No side protection for off-center hits
- Light bleeds around the edges
- Screen can swing/move
- Balls can escape the hitting zone
Even a basic DIY enclosure frame dramatically improves safety and experience.
My Recommendations
For most home simulators: Carl's Place Premium or SIGPRO Premier ($400-$600 for typical sizes)
You get true durability, excellent image quality, and the confidence that your screen will last for years. The price difference from standard is minimal compared to the total simulator investment.
For rooms with ambient light: Carl's High Contrast Gray or SIGPRO Premier Gray
The gray surface is worth it if you can't achieve complete blackout.
For multi-use spaces (garage with cars): HomeCourse ProScreen 180
Yes, it's expensive. But if you need retractable, get a quality retractable. Cheap manual systems are frustrating.
Budget option that's acceptable: Carl's Place Preferred (~$300)
If you truly need to save money on the screen, Preferred is the floor. Below that, you're sacrificing too much durability and quality.
What's Coming Next
Your screen displays the image, but the image comes from the projector. In Article 6, we'll dive into projector selection: throw ratio, lumens, resolution, and how to match a projector to your screen and space.
This is where the visual magic happens—or where it falls apart if you choose poorly.
Next up: Projector Selection: Lumens, Throw Distance & What Actually Matters
Questions about impact screens? Dealing with bounceback issues? Drop them in the comments.
Sign in to leave a comment
No comments yet. Be the first to comment!